
Affiliate disclosure: This article contains affiliate links. If you buy through them, we may earn a commission at no extra cost to you. As an Amazon Associate, I earn from qualifying purchases.
Measure the appliance, the airflow zone, and the basket path before deciding where it can safely operate.
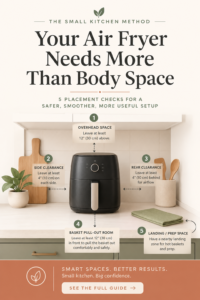
An air fryer can fit on a counter when switched off and still be a poor fit while cooking. The body may be narrow, yet the rear vent, hot-air path, wall cabinet, power cord, and basket all need room.
That is why the right answer is not a universal number. Clearance varies by model: some manuals specify distance from walls or objects, some name the top and rear, and others require open space around the appliance. Your exact manual decides the minimum.
The method below helps you turn those instructions into a real operating setup for a small apartment, condo, studio, or compact house kitchen.
Quick answer: use the clearance in your exact air fryer manual
Quick answer: Air fryer clearance is model-specific. Find the model number, read its current manual, and copy the stated rear, side, and overhead requirements. Then add room to open the basket, route the cord without heat or tension, and place the hot basket on a heat-resistant surface. If the manual is missing or the location cannot meet every stated condition, do not operate the air fryer there.
Four slim air fryers show why one clearance number fails
| Model | Published external size | Manual clearance language | Small-kitchen reality |
| Bella 4QT Slim | 14.56 D x 8.22 W x 11.14 H in | At least 4 in from walls or other objects during operation | The narrow body still needs a larger working zone. |
| Bella 6QT Slim | 15.31 D x 9.09 W x 10.9 H in | At least 4 in from walls or other objects during operation | More capacity increases depth, even though width stays slim. |
| Chefman TurboFry 3.5 QT | 14.29 D x 9.64 W x 8.46 H in | At least 6 inches above and behind for airflow | Its low body does not eliminate under-cabinet planning. |
| Instant Vortex Slim 6QT | 17.78 L x 10.20 W x 11.85 H in | At least 5 in around the air fryer when in use | The deepest body also carries the broadest stated clearance. |
Important limitation: these statements apply only to the identified models and manual versions. Recheck the exact model number and current manual before publishing or using the appliance.
Body dimensions are not the operating footprint
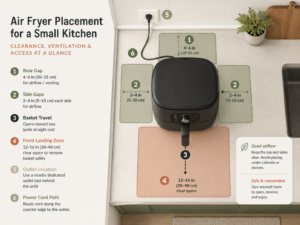
A product listing usually gives width, depth, and height. Those numbers tell you where the shell sits, not how much kitchen the appliance uses while it is hot. In a small kitchen, six zones can change the answer.
- Rear and side airflow: Keep vents and the manual’s stated clearance free of walls, backsplash rails, canisters, paper towels, curtains, and neighboring appliances.
- Overhead space: A unit that slides under a cabinet for storage may need to move into open space before cooking. Check the manual rather than assuming a low body is safe under cabinetry.
- Hot-air and steam path: The empty distance must also direct heat and steam away from faces, hands, outlets, painted surfaces, and items that can be damaged.
- Basket travel: The drawer must pull out fully without hitting a sink, wall, stool, person, or counter edge. You also need a stable place to set it down.
- Cord and outlet: The cord must reach without crossing a hot surface, hanging where it can be pulled, or forcing an unapproved extension-cord setup.
- Prep and landing space: Cooking should not remove the only safe cutting area. Preserve enough room for a board and a heat-resistant landing spot.
Can you use an air fryer under a cabinet?
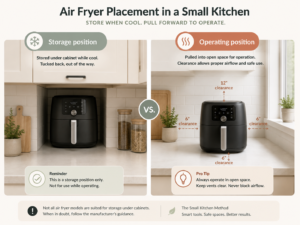
Only when the exact operating position meets the manual’s overhead and surrounding-clearance instructions. Do not decide from appliance height alone. A wall cabinet can sit close to the top even when the counter-to-cabinet opening looks generous, and a rear vent can direct hot air toward the backsplash or cabinet underside.
A practical small-kitchen setup may store the appliance under a cabinet while cool, then move it forward into a documented operating position. That works only if the counter remains stable, the unit stays safely back from the front edge, the cord is not strained, and every required gap remains open.
Do not guess: If the manual does not clearly support the proposed under-cabinet setup, contact the manufacturer with the exact model number. A generic online range cannot overrule the appliance instructions.
How to measure air fryer clearance in a small kitchen
- Find the exact model. Read the rating label and record the full model number, not only the brand and quart capacity. Similar-looking variants can have different instructions.
- Open the current manual. Search the manufacturer’s support page first. Copy the exact placement, airflow, outlet, surface, and cord instructions into your notes.
- Measure the proposed operating spot. Record clear width, counter depth, and counter-to-cabinet height. Measure to the nearest obstruction, not only to the wall.
- Map the appliance body. Use the manufacturer’s external dimensions, but verify whether the listed depth appears to include the handle. If uncertain, measure the actual unit before use.
- Add the documented clearance. Apply the manual’s requirement to the named directions. Do not invent extra or smaller buffers and do not translate one model’s rule to another.
- Test the moving parts while cold. Pull the basket out fully, simulate transferring food, and confirm a heat-resistant landing spot. Keep the appliance unplugged during this dry run.
- Check the whole cooking workflow. Confirm the cord path, outlet, prep board, sink access, neighboring appliances, cabinet doors, and people moving through the kitchen.
Worked example: a Bella 4QT Slim on a 24-inch-deep counter
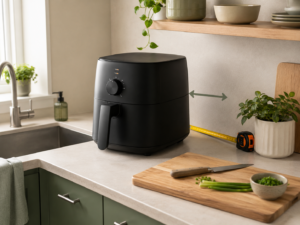
Assumptions: the counter is 24 inches deep from backsplash to front edge, the published appliance depth is 14.56 inches, and the exact Bella manual requires at least 4 inches from walls or other objects during operation.
14.56 inches of published depth + 4 inches behind the unit = 18.56 inches from the backsplash to the front of the listed appliance depth. On a 24-inch counter, that leaves 5.44 inches before the counter edge.
That calculation is a screening tool, not proof of a safe fit. It does not confirm whether the published depth includes the full handle, whether the unit is far enough from the front edge, or whether the basket can be pulled out and landed safely. The final check must use the actual appliance and exact manual.
Small-kitchen verdict: the Bella may fit the static counter depth yet still need a move-for-use routine or a different landing area. The real question is whether that routine is easy enough to repeat every time.
What to do when the counter is too small
If the counter is too shallow
Do not reduce the rear gap. Compare another stable operating surface, use a manufacturer-compliant appliance cart, or choose a shallower model after checking its own manual. A narrow air fryer can still be deep.
If the only space is under a wall cabinet
Store the unit there only when cool and dry, and then move it to an open operating location if the manual and counter geometry allow. If moving it puts the body too close to the counter edge, that location fails.
If you rent
Favor reversible changes: rearrange neighboring appliances, use a stable existing table, or create a move-for-use routine. Do not drill, alter outlets, or modify cabinetry without permission and qualified guidance.
If the outlet is inconvenient
Do not improvise with a cord route across the stove or sink. The U.S. Fire Administration advises plugging cooking appliances directly into a wall outlet and not using an extension cord. Follow the exact manual, which may be equally or more restrictive.
If the appliance is used daily versus monthly
A daily appliance should have a low-friction operating routine that preserves prep space. A monthly appliance may be better stored, provided its weight and path make repeated lifting realistic and it is fully cool and dry before storage.
Common air fryer placement mistakes—and the fix
- Mistake: treating 4-6 inches as a universal standard. Fix: copy the exact wording from the exact model manual.
- Mistake: measuring only the appliance body. Fix: add airflow, basket travel, cord, outlet, and landing zones.
- Mistake: leaving the unit against the backsplash because it is slim. Fix: create the documented rear gap before switching it on.
- Mistake: cooking under a cabinet without checking overhead guidance. Fix: Verify the manual and move the unit to a compliant open position when required.
- Mistake: placing it on a stove, sink cover, cloth, or unstable board. Fix: Use the stable, level, heat-resistant, or non-combustible surface specified by the manual.
- Mistake: letting paper towels, curtains, mail, or packaging enter the hot-air path. Fix: clear the complete operating zone before every use.
- Mistake: solving a short cord with an automatic extension cord assumption. Fix: follow the manual and use an appropriate wall outlet; ask a qualified electrician when the outlet setup is inadequate.
Safety limits and when to stop
This guide can help you measure and compare documented requirements. It cannot certify a counter material, electrical circuit, outlet, cabinet finish, cart, or landlord-approved installation.
- Stop and unplug the appliance if the cord or plug is damaged, the unit works intermittently, or the manual instructs you to stop for an error or smoke condition.
- Do not block vents, operate on a stovetop, or use near water, flame, curtains, paper, or other combustible material when the manual prohibits it.
- Keep hands and faces away from the vent path and use the handles and heat protection described in the manual.
- Ask the manufacturer about unclear placement language. Ask a qualified electrician about inadequate, damaged, loose, hot, sparking, or repeatedly tripping outlets or circuits.
Because models and safety notices change, check the manufacturer and the U.S. Consumer Product Safety Commission if you suspect a recall or model-specific hazard.
The no-buy option: improve the operating routine first
Before replacing the appliance, test whether a simple routine solves the problem: clear one stable section of counter, move the cool unit into its compliant cooking position, keep a heat-resistant landing area beside it, and return it only after it is fully cool and dry.
This works when the appliance is light enough to move comfortably and the final position satisfies every instruction. It stops being a good solution when lifting is difficult, the body sits near the edge, the cord is strained, or the routine takes away the only usable prep zone.
Recheck the setup when something changes
- After moving home, rearranging appliances, adding a cart, or changing wall cabinets.
- When replacing the air fryer with another size, model, or revision.
- When the cord, plug, basket, handle, feet, vent, or counter surface shows damage.
- When a new manual, manufacturer notice, or recall appears.
- When the setup starts blocking prep work, sink access, cabinet doors, or a safe walking path.
Air fryer placement measurement sheet
| Check | Your measurement | Decision note |
| Exact brand and model number | ________________________ | Match the rating label to the manual |
| Published width x depth x height | ________________________ | Record units and source date |
| Required rear clearance | ________________________ | Copy exact manual wording |
| Required side clearance | ________________________ | Copy exact manual wording |
| Required overhead clearance | ________________________ | Copy exact manual wording |
| Available counter width | ________________________ | Measure to nearest obstruction |
| Available counter depth | ________________________ | Backsplash to safe front boundary |
| Counter-to-cabinet height | ________________________ | Measure at operating position |
| Basket pull-out distance | ________________________ | Test the cold actual unit |
| Cord / outlet route | PASS / FAIL | No hot, wet, pinched, or strained path |
| Heat-resistant landing spot | PASS / FAIL | The basket can be set down safely |
| Final operating setup | PASS / FAIL | Every manual condition is met |
Frequently asked questions
How far should an air fryer be from the wall?
Use the exact model manual. In the examples checked for this guide, Bella specifies at least 4 inches from walls or other objects, while Instant specifies at least 5 inches around its Vortex Slim. Those numbers are model-specific, not universal.
How much space does an air fryer need above it?
The manual may name an overhead distance or require space around the appliance. Chefman’s TurboFry 3.5QT, for example, specifies at least 6 inches above and behind. If the manual is unclear, do not assume the counter-to-cabinet gap is sufficient.
Can I pull my air fryer out from under the cabinet while cooking?
That can be practical when the final operating position meets every clearance, stability, edge, cord, and surface instruction. Store it under the cabinet only when cool and dry, and test the move-for-use routine with the unit unplugged.
Can an air fryer sit on a wooden countertop?
The answer depends on the appliance manual and the counter’s condition and manufacturer guidance. Manuals commonly require a stable, level, heat-resistant, or non-combustible surface. If you cannot verify the surface, ask the countertop manufacturer or another qualified source.
Can I put an air fryer on top of the stove?
No for the models checked here: their manuals warn against placing or operating the appliance on a stove or other heat source. A burner can be switched on accidentally, and the surface may not meet the appliance instructions.
Can I use an extension cord with an air fryer?
Do not assume so. The U.S. Fire Administration advises plugging cooking appliances directly into a wall outlet, and the Instant Vortex Slim manual prohibits extension cords. Follow the exact manual and consult a qualified electrician if the available outlet is unsuitable.
Does a slim air fryer need less clearance?
Not automatically. “Slim” usually refers to body width. A narrow model can be deep and may still require several inches behind, above, or around it. Compare the complete operating zone, not only the width on the product page.
Bottom line
How much clearance an air fryer needs depends on the exact model. Start with the current manual, then add the basket path, cord and outlet, hot-air direction, heat-resistant landing spot, and a stable distance from the counter edge.
If the setup works only by reducing a documented gap, blocking a vent, straining the cord, or sacrificing safe prep space, it does not fit. Measure before you choose, then compare the fit-first trade-offs in our best slim air fryers for small kitchens guide or read the full Bella 4-Quart Slim Air Fryer review.
Sources and verification
Bella: Bella 4 qt Slim Air Fryer – official product page. Supports the 14.56 x 8.22 x 11.14-inch published dimensions and current model identity.
Bella / manual mirror: Bella 35100 4 qt Slim Air Fryer instruction manual. Supports the instruction to keep the appliance at least 4 inches from walls or other objects during operation.
Bella: Bella 6 qt Slim Air Fryer – official product page. Supports the 15.31 x 9.09 x 10.9-inch published dimensions and current model identity.
Bella / manual mirror: Bella 6 qt Slim Air Fryer instruction manual. Supports the 4-inch wall-or-object operating-clearance language.
Chefman: TurboFry 3.5 Qt. 4-in-1 Air Fryer – official product page. Supports the current model RJ38-35T-V2 and 14.29 x 9.64 x 8.46-inch dimensions.
Chefman: RJ38-35T-V2 Series User Guide, Dec. 5, 2025. Supports at least 6 inches above and behind the surface, heat, vent, cord, and damaged-cord guidance.
Instant Pot: Instant Pot 6QT Vortex Slim Air Fryer—official product page. Supports current product identity, SKU 140-3100-01, and the official-manual path.
Instant Brands: Instant Vortex Slim 6 QT Air Fryer User Manual, model AFB6002BK. Supports at least 5 inches around the air fryer, vent, stovetop, combustible material, cord, outlet, and cooling guidance; also lists the 17.78 x 10.20 x 11.85-inch dimensions.
U.S. Fire Administration: Never Use Extension Cords for Cooking Appliances. Supports direct wall-outlet guidance and checking cords for damage.
Amazon: Associates Program Operating Agreement. Supports the required associate identification statement; current page checked July 30, 2026.
Federal Trade Commission: Disclosures 101 for Social Media Influencers. Supports clear, conspicuous disclosure practice; used as an editorial compliance reference.